Product: LABEL MATRIX
Version: All Versions
If you are attempting to create an ODBC connection to a .txt extension type file, you may encounter some issues with your data displaying properly depending on how that data is formatted. The following article will walk you through creating a proper connection to multiple datatype files, whether they be comma or tab delimited. The image below displays the tab delimited file we'll be importing into LABEL MATRIX as a database connection.

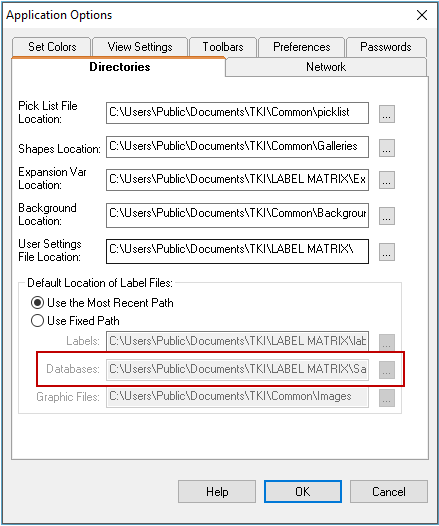
1. Verify the file is stored in the default directory for databases. You find this directory by navigating to Tools > Setup and clicking the Directories tab.
/msdyn_blobfile/$value)

2. Open the ODBC Datasources (32-bit) Administrative Tool.
NOTE: This is a guide for this specific issue regarding attaching .txt files as databases within LABEL MATRIX using various delimiters. We do not provide technical support for the Windows platform or its functions, only TEKLYNX software.

3. Select the System DSN tab, then click Add.
We recommend creating a System DSN instead of a User DSN, since it will allow everyone on your network to have access to this ODBC connection through LABEL MATRIX.

4. Select the Microsoft Access Text Driver from the list of Provider Drivers. Click Finish.

5. Name the Data Source. This name does not need to match the name of the file. Uncheck Use Current Directory and click Select Directory to navigate to the default directory for LABEL MATRIX database files. Click OK.
/msdyn_blobfile/$value)
/msdyn_blobfile/$value)
6. Click Options and select .txt from the Extensions List. Click Define Format.
/msdyn_blobfile/$value)
7. Select the .txt file from the Tables menu, check Column Name Header (if relevant) and click Guess to query the file and view the columns. Select the appropriate format and data type from the drop-down menus. Click OK.

8. You may see the error shown below. This seems to be a Windows issue, but does not affect the file or its format at all. Click OK to exit the Error window, and click OK once more to exit complete ODBC Text Setup.

9. You will see the newly created ODBC connection within the ODBC Administrator window. Click OK.

10. Now that we have created the initial ODBC connection within Windows, we can connect to this through LABEL MATRIX. Navigate to File > Label Properties.
/msdyn_blobfile/$value)
11. Click the Database tab, and select Add.

12. Choose Advanced Setup and click Next.
/msdyn_blobfile/$value)
13. Check Select an OLE DB Provider Driver and click Next.

14. Select the Microsoft OLEDB Provider for ODBC Drivers and click Next.

15. Select the desired ODBC connection from the list of previously created ODBC connections. Click Next.

16. Select the .txt file from the default folder location for databases.

17. Select the file and click Open. Click Next.

18. The Records Analyzed window will query the data using the OLEDB for ODBC Provider Driver and provide you with some sample data from the file. Click Next.

19. Select the desired method of access and click Next.

20. Name the database connection. This is how it will be displayed within LABEL MATRIX. Click Finish.

21. You will see the new connection in the Database tab of the Label Properties window. Click OK.

22. To test the connection, select the DataGrid button within LABEL MATRIX to display a query of the data in the Database.
/msdyn_blobfile/$value)

