Product: LABELVIEW, CODESOFT
Version: All Versions
OVERVIEW
Object linking and embedding (OLE) allows files created in other applications to be included in label designs. LABELVIEW and CODESOFT provide an OLEDB administrator for establishing links between the document and database or spreadsheet files created in other applications (e.g., Microsoft Access and Excel). With the link in place, data can be accessed to populate a field in your label.
PROCEDURE
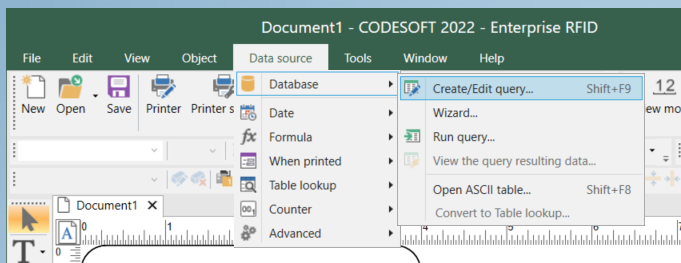
1. Navigate to Data source >Database > Create/Edit query to launch the Query definition dialog box. Alternatively, if the Data Source window is open on the far right hand side, right-click on Database and select Create/Edit query.


2. Click the New button and select OLEDB from the drop-down. This will open the OLEDB Administration window.

3. Click New to launch the Data Link Properties dialog box.
NOTE: This and the following dialog boxes are part of Microsoft’s Data Link program and, as such, are supported by Microsoft’s online Help.

4. Select the correct Provider for your source file from the list provided. Click Next.
For example, if your data is generated using SQL, choose the SQL provider; if Microsoft Access, choose the Microsoft Jet (.mdb) or Microsoft Access Database Engine (.accdb). For programs or files not listed (e.g., dbf) you'll need to install the appropriate provider and/or driver before proceeding.

5. Enter the information required for the selected provider. Click OK.
NOTE: The properties on the Connection tab vary depending on the selected provider, but the name and location of the data file are required, as well as any password information needed to open the file.


6. In the Connection box, type a name for the connection, and click OK.

7. The newly created connection should show up in the Administrator OLE DB Connections listing. Click OK to return to the Query definition dialog box.

8. The connection is now visible in the Select a data source dropdown in the Query definition dialog box.

9. Select the appropriate table from the Select a table drop-down. The fields associated with the table will appear in the Select fields box.
NOTE: If you'll be working with multiple tables, it may be helpful to have table names displayed with field names. To do this, click the Include name of tables check box.
/msdyn_blobfile/$value)
10. Select the fields you'd like to include on the label, and click OK.
/msdyn_blobfile/$value)
11. Select Yes or No when asked whether you'd like to save the query. Saving the query is not required, and choosing not to save it will not impact the database connection in any way.
/msdyn_blobfile/$value)
12. Navigate to Data source > Your Connection > Your Field and select Place to add the field to your label. Alternatively, right-click the field in the Data sources window and click Place.
/msdyn_blobfile/$value)

