Product: LABELVIEW, CODESOFT
Version: All Versions
OVERVIEW
Open database connectivity (ODBC) is the standard method or “protocol” for sharing data between databases and other applications (such as LABELVIEW), and the ODBC Administrator is the program you use to establish the link between TEKLYNX software and the external database. The ODBC Administrator is provided by Microsoft and can be accessed through LABELVIEW/CODESOFT or the Windows Control Panel. LABELVIEW can accept data from a wide variety of databases, as long as you have an open database connectivity (ODBC) driver that is compatible with the database to which you want to connect
PROCEDURE
This lesson covers installing a Microsoft Access data source and driver. For information on using the ODBC Administrator to install other drivers or perform other functions, click Help in any of the Administrator dialog boxes.
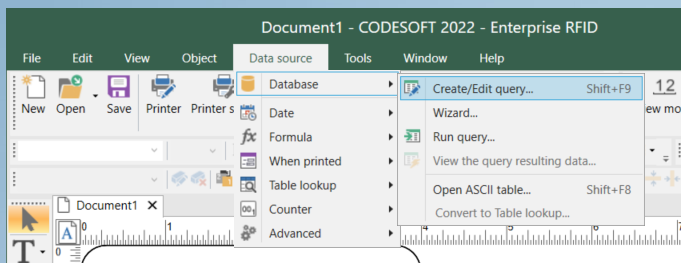
1. Navigate to Data source >Database > Create/Edit query to launch the Query definition dialog box. Alternatively, if the Data Source window is open on the far right hand side, right-click on Database and select Create/Edit query.


2. Click the New button and select ODBC database type to launch the ODBC Data Source Administrator dialog box.

3. Click Add. The Create New Data Source dialog box appears.

4. Select the Microsoft Access Driver (*.mdb, *.accdb) and click Finish. The ODBC Microsoft Access Setup dialog box appears. NOTE: You can create a File Data Source Name (DSN) if you want to store data source parameters in a File DSN (text file with the .DSN extension), which can be distributed from one machine to another.

5. In the Data Source Name box, add a name to the data source. Add a description if you would like. Click Select button under the Database section.

6. The Select Database dialog box appears.

7. Select the .mdb database from the folder it was saved under. Click OK. The data source is now associated with a database.

8. Click OK until you exit the Administrator and return to the Query definition dialog box.

9. In the Select Data Source dropdown box, click on the name of the file connection created in the steps above, ex. Test.
NOTE: For future projects, if the data source you select has not been associated with a database, a Windows dialog box appears asking for more information. For example, you may need to specify the database or (for Excel) the workbook.

10. Select the appropriate table from the Select a table drop-down. The fields associated with the table will appear in the Select fields box.
NOTE: When working with multiple tables, it may be helpful to have table names displayed with field names. To do this, click the Include name of tables check box.

11. Select the fields you'd like to include on the label, and click OK.

12. Select Yes or No when asked whether you'd like to save the query. Saving the query is not required, and choosing not to save it will not impact the database connection in any way.
/msdyn_blobfile/$value)
13. Navigate to Data source > Your Connection > Your Field and select Place to add the field to your label. Alternatively, right-click the field in the Data sources window and click Place.
/msdyn_blobfile/$value)

